DIY | Ombre Nail Tutorial

Happy Thursday Lovlies! I’m so excited to bring you this DIY ombré nail tutorial designed by my cousin, just in time for Valentine’s day. 💕  My cousin describes this look as a Lana del Rey inspired edgy romantic style.  Cue “Young and Beautiful“, this beautiful ombré effect is so simple to do!  The look is meant to be a little messy which makes the application that much easier.  The gradient pink of this DIY helps to draw attention towards the tip of the nails, without being overly dramatic.  Oh, and did you notice the little gold heart detail?  A little detail that others can’t notice from afar, but you’ll know, since it’s a heart just for you.  😘

DIY Ombré nail tutorial

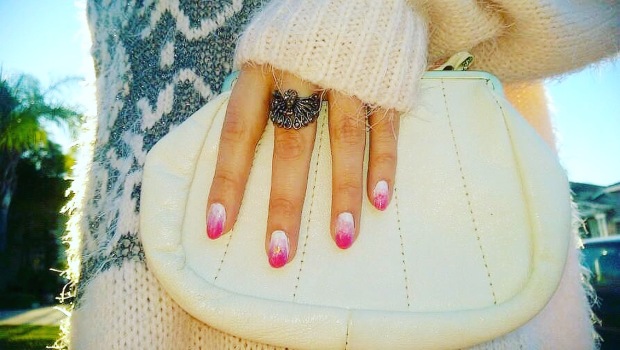
Pair this nail style with something comfy but cute.  Our #OOTD is a pale pink romantic sweater paired with jeggings and combat boots, to add a edgy vibe.  A simple white clutch completes this look with a pair of rings.


DIY | Ombre Nail Design


What you’ll need

  • White nail polish
  • Two shades of pink nail polish (One brighter than the other)
  • Gold nail polish
  • Eye-shadow sponge
  • Small piece of aluminum foil
  • Nail art dotting tool
  • Nail polish remover
  • Q-tips

How to

  1. Start with the white nail polish to set the base for your design.  Apply two thin coats and allow to completely dry before moving to Step 2.
  2. Apply a drop of the lighter pink polish on a piece of aluminum foil.
  3. Dab your sponge in the polish from Step 2 and sponge on (lightly stippling) to cover 3/4 of your nail, starting from the tip; let completely dry before moving on to Step 4.
  4. Using the same technique from Steps 2 & 3 apply the brightest shade of pink polish to 1/4 of the nail, starting from the tip, adding color until you build the desired intensity.  Allow to completely dry.  You can either stop here and skip to Step 6 or add the heart design.
  5. Heart Design: Using the dotting tool, add two dots of the gold nail polish side by side leaving a small space in between.  Drag the two dots downward at an angle, connecting each end to form a heart.
  6. Use a q-tip soaked in nail polish remover to remove excess polish.
  7. Seal the design with a clear top coat.
  8. Repeat on the rest of your nails.

Tips

  • Start with clean nails.
  • Do one hand at a time.
  • In order to avoid muddy colors, allow the polish to completely dry before moving to the next step.
  • Dampen the sponge with water to avoid over saturation.  This also helps for smoother application.
  • In order to avoid making a mess, dot the nail polish on aluminum foil or a wax plate instead of paper.  Nail polish will soak through paper and could potentially leave a mess.
  • Don’t have a dotting tool?  Make your own by sticking a pin in the eraser end of a pencil.
  • For the heart design, work quickly to make your connecting lines before the dots dry.

XOXO

Follow me on Instagram!

Instagram

DIY | Art Deco Nail Design

Hi lovelies! Happy Thursday! Are you ready for the weekend? I know I am. 🙂

Here is a Great Gatsby inspired DIY nail design for you to try.  My cousin channeled her inner Daisy Buchanan when coming up with this nail art idea and drew inspiration from the black and gold color styling of that era.  The Art Deco feel is achieved by using geometric lines in the design.  This nail art is very simple and low-maintenance but achieves a sophisticated look.  My cousin loves this style because since the polish doesn’t extend all the way to the tips, the manicure never chips!

image

It’s the perfect look for a glamorous night out and would pair well with that little black dress.

black lace top


DIY | Art Deco Nail Design


What you’ll need

  • Tape
  • Gold Nail Polish
  • Black Nail Polish
  • Nail Striper or Thin Brush
  • Nail polish remover
  • Q-tips

How to

  1. Form a triangle on your nail with two pieces of tape.
  2. Apply two thin coats of gold polish inside the space between the tape.
  3. Immediately remove the tape after the second coat and allow the polish to completely dry before moving on to the next step.
  4. Using the thin brush, outline the triangle with black polish.
  5. Draw a line from the bottom right corner of the triangle to 3/4 of the top.
  6. Use a q-tip soaked in nail polish remover to remove excess polish.
  7. Seal the design with a clear top coat.
  8. Repeat on the rest of your nails.

Tips

  • Start with clean nails.
  • Do one hand at a time.
  • Remove the tape before the polish is completely dry.
  • For Step 4, lay the thin brush lengthwise along the triangle and pull your finger away swiftly for an effortless line.
  • For thin lines, use light pressure.

Hope this DIY inspires you for your glam night out.

XOXO

Follow me on Instagram!

Instagram

I’m on Instagram!

Happy Sunday lovelies! 💕  Hope you are having a nice lazy day.  😋  Just wanted to give you an update. I’m on Instagram!  Follow me so that I can follow you.  I’ll be posting on a daily basis and am looking forward seeing what you’ll be up to.

image

XOXO

OOTD | New Year, Same Shoes

Happy 2016 lovelies!  It’s a New Year, but the same me. 😜  Went for a ‘kind of’ hike up Soledad Mountain in San Diego the other day.  I say ‘kind of’ because we drove to the top, then “hiked up” the set of stairs. 🙂 teehee

New Year OOTD

It was sweater weather.  The sun was out and the sky such a vibrant blue.  The view from the top of the mountain is incredible.  You can see the whole La Jolla coast.

Soledad Mountain

I wore my favorite studded booties in tan, a black and white plaid shirt, jeggings, and light grey pull-over.

image

I love the ribbed texture of the pull-over. The material is so soft and warm.

Light grey pull over sweater

Jeggings and booties

In the spirit of the holidays, I went with a dark red polish.

I kept the accessories simple with a black Betsey Johnson bow ring and small black Marc Jacobs clutch.

image

How did you celebrate the first day of the New Year?

Star cookie chocolate cupcake

XOXO

Atotonilco el Alto | Las Calles Compuestas, Jalisco, Mexico

“Las Calles Compuestas” is an annual tradition which celebrates the feast of the Immaculate Conception from November 30 to December 8 in Mexico.  Atotonilco el Alto is a province of Jalisco, Mexico, that is more famously known for this celebration.

Calles Compuestas Atotolinco

The literal translation of the name of the celebration is “Composed Streets”.  The origin of the name for this tradition stems from the fact that this feast is not just celebrated in churches or the city plaza, but instead in the city streets.

Calles Compuestas Yellow

Calles Compuestas Green

Each street is adorned with paper mache flowers and cloth overhead .

Calles Compuestas Upclose

Calles Compuestas Flowers

Calles Compuestas White

Music, food, drink, and fireworks are also used as part of the celebration.

Calles Compuestas Churros

Calles Compuestas Blue

Some of my relatives recently traveled to Mexico and were able to attend this celebration.  They were kind enough to share their photos so that I could share them with you.

Please feel free to ask any questions.  Hope you are having a great day. 🙂

XOXO